ကျွန်တော်တို့ ansible လေ့လာတဲအခါမှာ ansible.cfg နဲ့ inventory file တွေကအရေးပါပါတယ်. ကျွန်တော် တို့ automate လုပ်ချင်တဲ့ resources ကို ဘယ်လို့ connect လုပ်မယ်, ဘယ် protocol ကိုသုံးမယ်တို့ကို ansible.cfg and inventory မှာ သတ်မှတ်လို့ရပါတယ်.
ကျွန်တော်တို့ projects တစ်ခုချင်းစီ ansible.cfg ကို သတ်မှတ်တာ ကောင်းပါတယ်, တစ်ကယ်လို့ projects directory မှာ ansible.cfg ကို မသတ်မှတ်ထားရင် ansible က /etc/ansible/ansible.cfg ကို default အနေနဲ့သုံးပါတယ်. /etc/ansible/ansible.cfg မှာ ကိုယ် automate လုပ်မဲ့ resources ပေါ်မူတည်ပြီး သတ်မှတ်လို့ရပါတယ်.
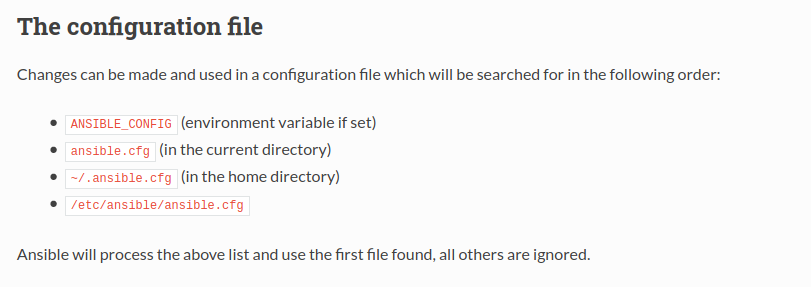
ansible ရဲ့ configuration file precedence rules order ကိုကြည့်ပါ.
ansible.cfg ကို INI format နဲ့ ရေးလို့ရပါတယ်.
ကျွန်တော်တို့ ansible.cfg ကို ကြည့်ရအောင်.
vim /etc/ansible/ansible.cfg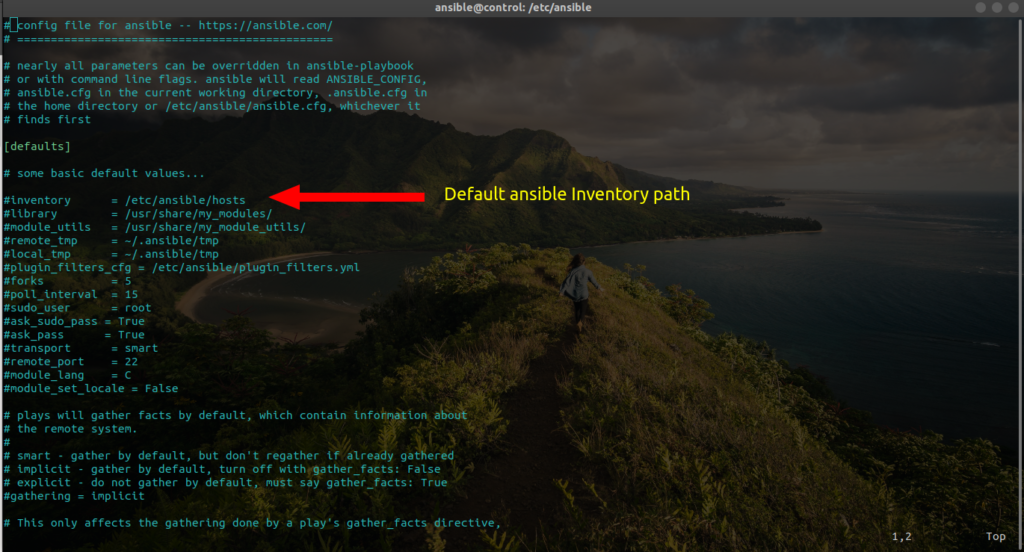
တစ်ကယ်လို့ ansible inventory file ကို project directory ထဲမှာ မသတ်မှတ်ထားရင် ansible.cfg မှာသတ်မှတ်ထားတဲ့ /etc/ansible/hosts file ကို default အနေနဲ့ သုံးပါတယ်.
ကျွန်တော်တို့ project directory တစ်ခုတည်ဆောက်ပြီး ansible.cfg file ကို create လုပ်ကြည့်ရအောင်.
ansible user ရဲ့ home directory မှာ project folder တစ်ခုတည်ဆောက်ပါ, ပြီးရင် ansible.cfg file ကို တည်ဆောက်ပါ. ကိုယ်လိုချင်တဲ့ အပိုင်းကို /etc/ansible/ansible.cfg ကနေနမူနာ ယူလို့ရပါတယ်.
 mkdir test
 cd test
 vim ansible.cfg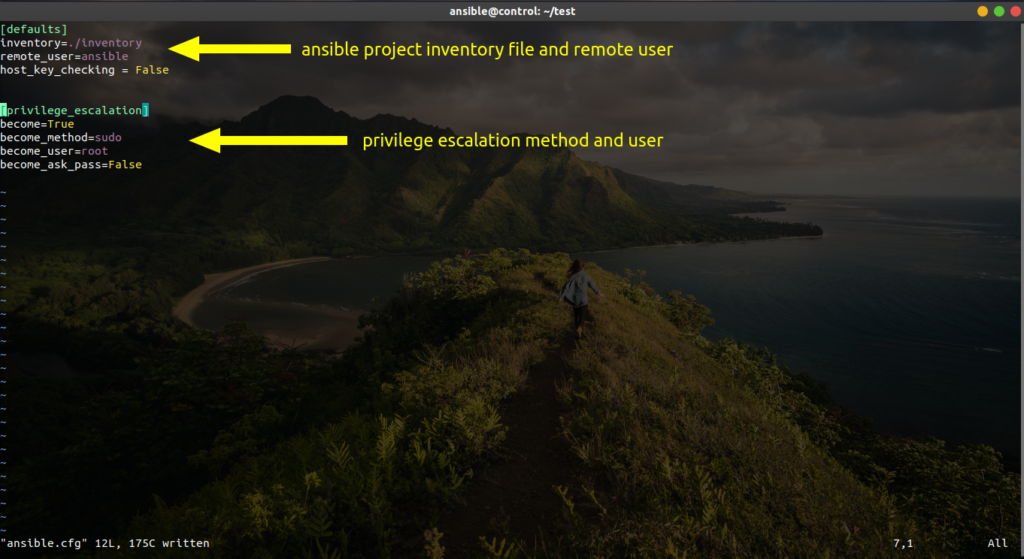
ကျွန်တော်တို့ ansible.cfg ရဲ့ defaults label အပိုင်းကိုကြည့်ရအောင်.
ကျွန်တော်တို့ ansible inventory အဖြစ် project inventory file ကို သတ်မှတ်ထား ပါတယ်. managed host မှာ သုံးမဲ့ remote_user ကို ansible user ကို သတ်မှတ်ထား ပါတယ်. root user ကို သုံးလဲရပါတယ်, ဒါပေမဲ့ dedicated user ကို သုံးတာကောင်းပါတယ်.
host_key_checking = False က control host ကနေ managed host ကို automate လုပ်တဲ့အခါမှာ password တောင်းတာကို control လုပ်တာပါ. ကျွန်တော်တို့ က dedicated user ( ansible ) အတွက် passwordless authentication and sudo privilege က သတ်မှတ်ပြီး သာဖြစ်လို့ မလိုပါဘူး. ansible user က control and manage hosts တွေမှာ ssh key pair and sudoer file က define လုပ်ပြီး သာပါ.
အခြား users တွေကို လဲ control and managed hosts မှာ ssh key pair and sudoer file ကို define လုပ်ပြီးသုံးလဲရပါတယ်.
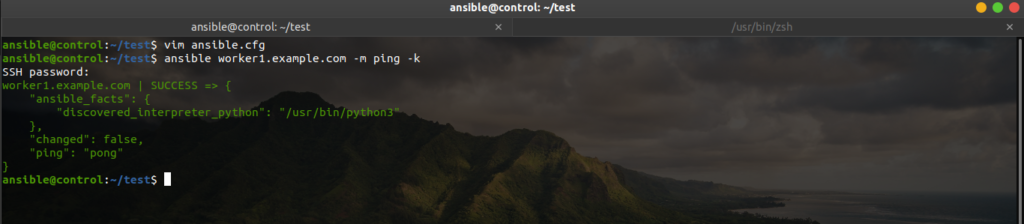
ဒါမှမဟုတ် host_key_checking = True လို့ ansible.cfg file မှာ သတ်မှတ်ပြီး ansible ad-hoc or playbook run တဲ့ အချိန်မှာ -k argument ကို သုံးပြီး password နဲ့ သုံးလဲရပါတယ်.
 sudo apt install sshpass -y
ansible worker1.example.com -m ping -k 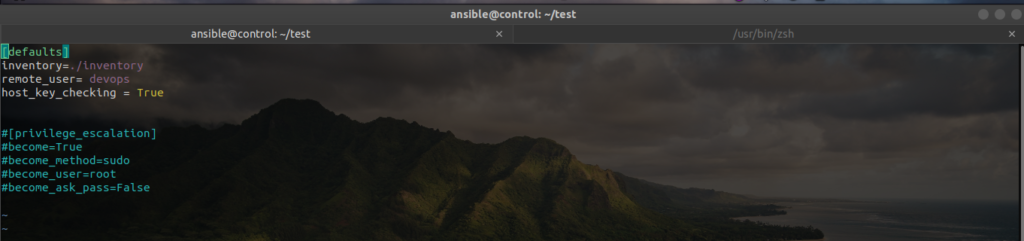
managed hosts မှာသုံးမဲ့ user ကို devops user ကိုသတ်မှတ်ပြီး host_key_checking = True လို့သတ်မှတ်ထားပါတယ်.
ကျွန်တော်က devops user အတွက် privilege escalation ( sudoer ) ကို ansible.cfg မှာ comment ပိတ်ထားပါတယ်. devops user အတွက် managed hosts မှာ sudoer file မသတ်မှတ်ထားလို့ပါ.
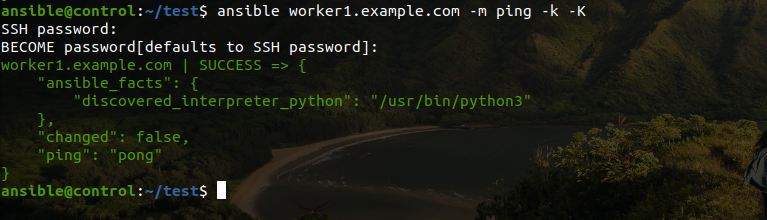
တစ်ကယ်လို့ devops user ကို managed hosts မှာ sudo privileged access သုံးချင်ရင် ansible ad-hoc or playbook run တဲ့အခါ -K option ထည့် သုံးလို့ရပါတယ်.
ansible worker1.example.com -m ping -b -k -K-b = become ( privilege escalation ( sudo or su ) )
-k = ask-pass ( ask connection password )
-K = ask-become-pass ( ask for privilege escalation )
ansible user အတွက် က ansible.cfg file မှာ privilege escalation နဲ့ passwordless authentication ကို သုံးလို့ရပါတယ်. managed hosts မှာ ansible user အတွက် sudoer file & ssh key pair ကို သတ်မှတ်ပြီးတာဖြစ်လို့ပါ.
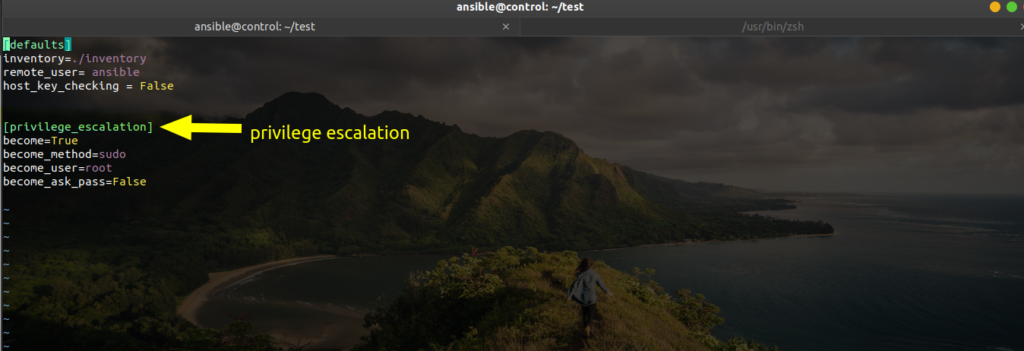
ကျွန်တော်တို့ ansible.cfg ရဲ့ privilege escalation label အပိုင်းကို ကြည့်ရအောင်.
- become = True က ကျွန်တော်တို့ privilege escalation ကိုသုံးမယ်လို့သတ်မှတ်တာပါ.
- become_method = sudo က privilege escalation ကို sudo အနေနဲ့ သုံးမယ်လို့ပြောတာပါ, su ကိုသုံးလဲရပါတယ်.
- become_user = root က privilege escalation ကိုသုံးရင် root user အနေနဲ့သုံးမယ်လို့ပြောတာပါ, အခြား users တွေသုံးလဲရတယ်.
- become_ask_pass = False က privilege escalation ကို managed hosts မှာသုံးရင် password လို မလိုကို သတ်မှတ်တာပါ, ကျွန်တော် တို့က ansible user ကို managed hosts မှာ sudoer file သတ်မှတ်ပြီးလို့ False လို့ သတ်မှတ်ထားတာပါ.
ansible configuration file ကို ကိုယ် managed လုပ်ချင်တဲ့ resources type ပေါ်မူတည်ပြီး သတ်မှတ်လို့ရပါတယ်.
ansible configuration file ရဲ docs ကို အောက်ပါ link မှာကြည့်ပါ.
Ansible Inventory
Control Host ကနေ Managed လုပ်မဲ့ resources တွေကို ansible inventory မှာ မှတ်ထားလို့ရပါတယ်. ansible inventory ကို INI or YAML format နဲ့ မှတ်လို့ရပါတယ်.ansible inventory နှစ်မျိုး ရှိပါတယ်, static inventory and dynamic inventory.
static invemtory
တစ်ကယ်လို့ inventory file ကို project directory မှာ မသတ်မှတ်ထားရင် /etc/ansible/hosts file ကို ansible ရဲ့ default inventory file အနေနဲ့ သုံးပါတယ်.
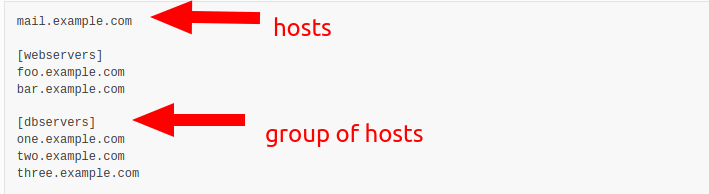
ansible က managed လုပ်မဲ့ resources တွေကို inventory file ထဲမှာ list or group of list အနေနဲ့ သိမ်းလို့ရပါတယ်.
ansible inventory file ကို YAML format နဲ့ ရေးလို့ရပါတယ်, INI ကိုသုံးတာများပါတယ်.
YAML file ကို အောက်ပါအတိုင်းရေးလို့ရပါတယ်.
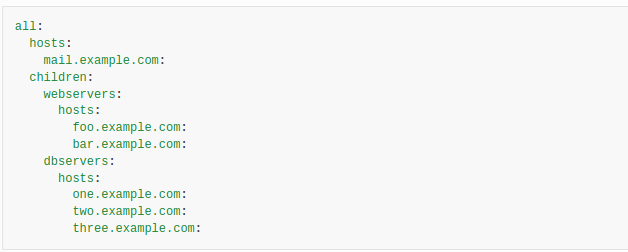
ansible inventory ထဲမှာ မှတ်ထားတဲ့ resources တွေက default groups နှစ်ခုထဲမှာ ပါပြီးတာပါ.
all and ungrouped group
all group ထဲမှာ ကျွန်တော်တို့ manage လုပ်မဲ့ resources အားလုံးပါ ပါတယ်.
ungrouped group ထဲမှာ all group ကလွဲ၍ အခြား group ထဲမှာ မပါတဲ့ resources တွေပါ ပါတယ်.
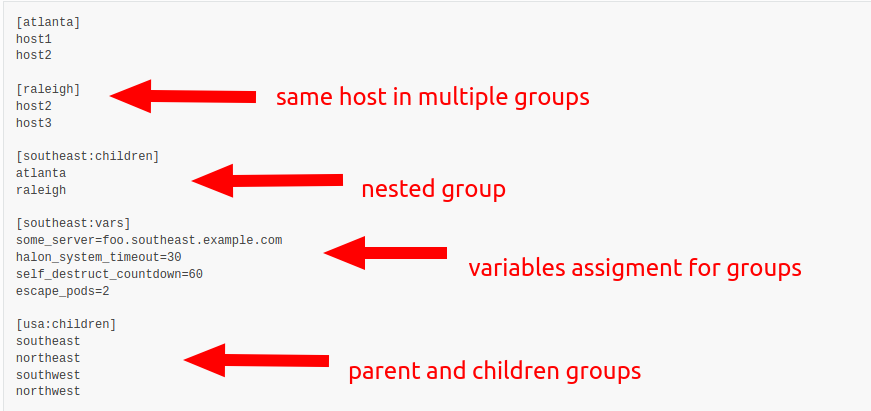
resources တွေကို multiple groups တွေမှာ မှတ်လို့ရပါတယ်. inventory ထဲမှာ group တွေကို nested မှတ်လဲရပါတယ်.
groups တွေကို အခြား group ထဲမှာ children group အနေနဲ့ ထည့်လို့ရပါတယ်.
inventory file ထဲမှာ variables တွေကိုလဲ သတ်မှတ်လို့ရပါတယ်. best practice အနေနဲ့ var file or directory သတ်မှတ်ပြီး သိမ်းတာပိုကောင်းပါတယ်.
multiple inventory resources ကို ansible (ad-hoc) or ansible playbook မှာ -i option နဲ့ သုံးလို့ရပါတယ်.
 ansible -i inventory all  -m ping
 ansible-playbook example.yml -i inventory
ansible inventory မှာ managed လုပ်မဲ့ resources တွေကို ဘယ်လို connect လုပ်မလဲ ကို သတ်မှတ်လို့ရပါတယ်.

static inventory docs ကို အောက်ပါ link မှာကြည့်ပါ.
https://docs.ansible.com/ansible/latest/user_guide/intro_inventory.html
dynamic inventory
dynamic inventory ကို dynamic ဖြစ်တဲ့ resources တွေကို managed လုပ်တဲ့ အခါမှာ သုံးပါတယ်.
cloud provider, LDAP, Cobbler, enterprise CMDB တွေကို manage လုပ်တဲ့အခါမှာသုံးပါတယ်.
cloud resources အတွက် ကိုယ် managed လုပ်မဲ့ resources က static ဖြစ်ရင် static inventory ကို သုံးလို့ရပါတယ်.
cloud resources တွေကို ansible သုံးပြီး ဘယ်လို့ automate လုပ်မလဲကို ကျွန်တော် share ထားတဲ့ post တွေရှိပါတယ်.
external inventory ကို connect လုပ်ဖို့ ansible က နှစ်မျိုး support လုပ်ပါတယ်, Inventory plugins and Inventory Scripts.
ansible inventory ကို အောက်ပါ command နဲ့ debug လုပ်လို့ရပါတယ်.
ansible-inventory –list
Inventory plugins docs ကို အောက်ပါ link မှာကြည့်ပါ.
https://docs.ansible.com/ansible/latest/plugins/inventory.html#inventory-plugins
Inventory scripts docs ကို အောက်ပါ link မှာ ကြည့်ပါ.
ansible ကို ဆက်လေ့လာလိုလျှင်.
https://www.jeffgeerling.com/blog/2020/ansible-101-jeff-geerling-youtube-streaming-series
https://www.ansiblefordevops.com/