ကျွန်တော်တို့ ansible မှာ automate လုပ်ချင်တဲ့ resources တွေရဲ့ IP, hostname တွေကို ansible inventory ကိုသုံးပြီးမှတ်ထားပါတယ်.
ansible inventory မှာ static and dynamic inventory နှစ်မျိုးရှိပါတယ်.
ကျွန်တော်တို့ automate လုပ်မဲ့ resources တွေရဲ့ IP, hostname တွေက အပြောင်းအလဲသိပ်မရှိရင် static inventory ကိုသုံးရတာ အဆင်ပြေပါတယ်.
static inventory နဲ့ပါတ်သက်ပြီးကျွန်တော်အရင်က sharing လုပ်ထားတာရှိပါတယ်.
ကျွန်တော်တို့ automate လုပ်ချင်တဲ့ resources တွေရဲ့ IP, hostname တွေက အလုပ်ရဲ့လိုအပ်ချက်ပေါ်မူတည်ပြီး အပြောင်းအလဲများနေရင် static inventory ကိုသုံးရတာအဆင်မပြေပါဘူး, ကျွန်တော်တို့ dynamic inventory ကိုသုံးရမှာပါ.
ကျွန်တော်တို့ ansible dynamic external inventory ကိုသုံးပြီး automate လုပ်ချင်တဲ့ resources တွေရဲ့ Inventory ( IP, FQDN, port, connection type, ssh key ) တွေကို cloud providers ( public/private ), LDAP server, Cobbler ( Linux Installation Server ), Enterprise CMDB ( configuration management database ) ကနေခေါ်သုံးလို့ရပါတယ်.
ansible က external inventory တွေနဲ့ connect လုပ်ဖို့ နည်းနှစ်မျိုး (Inventory Plugins and Inventory Scripts )ကို support လုပ်ပါတယ်.
Inventory Plugins and Inventory Scripts ကိုသုံးပြီး external inventory တွေကို ကျွန်တော်တို့ connect လုပ်လို့ရပါတယ်.
Inventory Plugins က ansible core version နောက်ပိုင်းမှာပါလာတဲ့ update ပါ, အရင်က ကျွန်တော်တို့ Inventory Scripts ကိုသုံးပါတယ်.
ကျွန်တော်တို့ Inventory Plugins or Scripts နှစ်မျိုးလုံးကိုကိုယ်တိုင်ရေးချင်လဲရပါတယ်, Python နဲ့ရေးတာများပါတယ်.
ကျွန်တော် sharing လုပ်ချင်တာက AWS ( public cloud provider ) မှာ run ထားတဲ့ EC2 instances တွေရဲ့ Inventory ကို ansible dynamic plugins ကိုသုံးပြီး ခေါ်သုံးတာကို sharing လုပ်ချင်ပါတယ်.
ansible က support လုပ်တဲ့ အခြား resources တွေရဲ့ dynamic inventory တွေကို အောက်ပါ link မှာကြည့်ပါ.
ကျွန်တော်တို့ ansible ကို AWS ကို automate လုပ်ဖို့လိုအပ်တဲ့ python library တွေကိုအရင် install လုပ်ထားဖို့လိုပါတယ်.
Prerequisites
- python3
- boto3 and botocore ( aws python library )
- ansible binary
- aws-cli ( aws commandline )
- aws cloud9 IDE or other IDE
ကျွန်တော်တို့ အရင်ဆုံး python ကိုအရင် install လုပ်ဖို့လိုပါတယ်.
ကျွန်တော်က AWS Cloud9 IDE ကိုသုံးထားပါတယ်. AWS Cloud9 မှာအသုံးများတဲ့ Programming Languages တွေကို Default အနေနဲ့ install လုပ်ပြီးတာပါ.
ကျွန်တော်တို့ python3 ကို install လုပ်ထားတာကို အရင်စမ်းကြည့်ပါ.
python3 --versionလိုအပ်တဲ့ python library ( boto3 and botocore ) တို့ကို install လုပ်ပါ.
pip3 install boto3 botocore
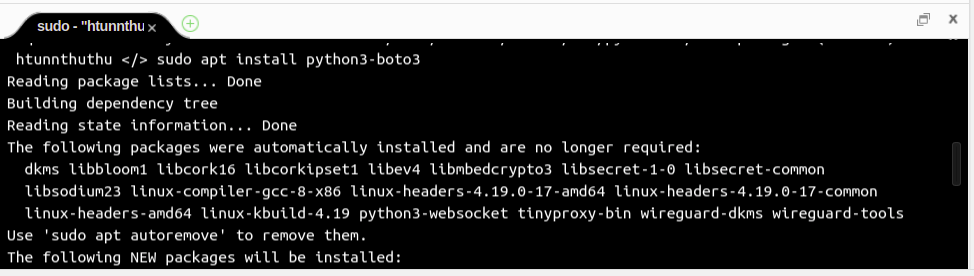
sudo apt install python3-boto3
pip3 install ansible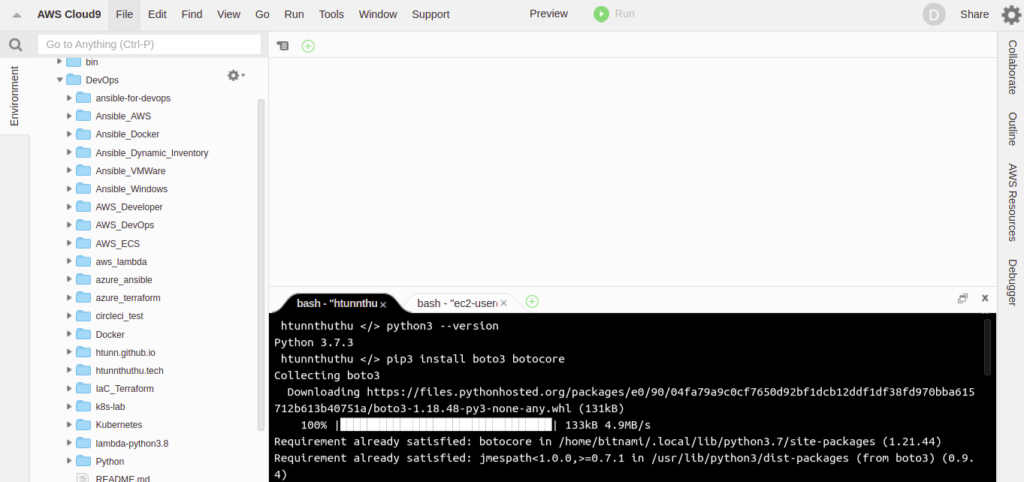
ansible ကို install လုပ်ပါ. ကျွန်တော်က pip နဲ့ install လုပ်ထားပါတယ်. apt or yum ကိုသုံးပြီး install လုပ်လဲရပါတယ်.
pip3 install ansible
ansible --version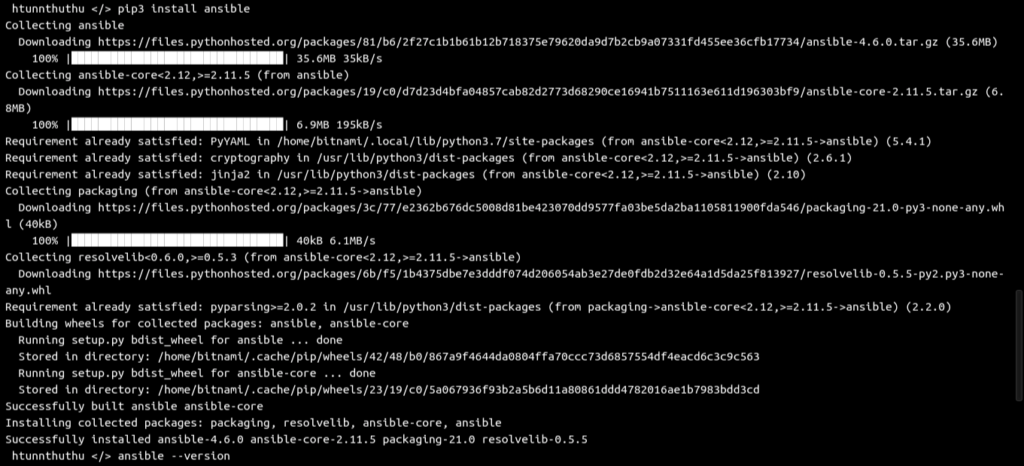
ansible က AWS ရဲ့ resources တွေကို automate လုပ်ဖို့ boto3 and aws-cli ကိုလိုပါတယ်, ansible ကို run မဲ့ host မှာကျွန်တော်တို့က အရင် install လုပ်ထားဖို့လိုပါတယ်.
localhost မှာ run မယ်ဆိုရင် localhost မှာ aws-cli and boto3 ကို install လုပ်ရမှာပါ. အခြား host မှာ install လုပ်ပြီး delegate_to ကိုသုံးပြီး run လဲရပါတယ်.
aws-cli ကို အောက်ပါ link မှာ install လုပ်ပါ.
aws-cli ကို install လုပ်ပြီးရင် AWS ကို aws-cli နဲ့ manage လုပ်ဖို့လိုအပ်တဲ့ programmatic access အတွက် aws access key and secret access key ကို AWS ရဲ့ console မှာထုတ်ထားဖို့လိုပါတယ်.
AWS programmatic access အတွက် key ကို AWS Console မှာထုတ်တာကို ကျွန်တော်အရင်က sharing လုပ်ထားတာရှိပါတယ်.
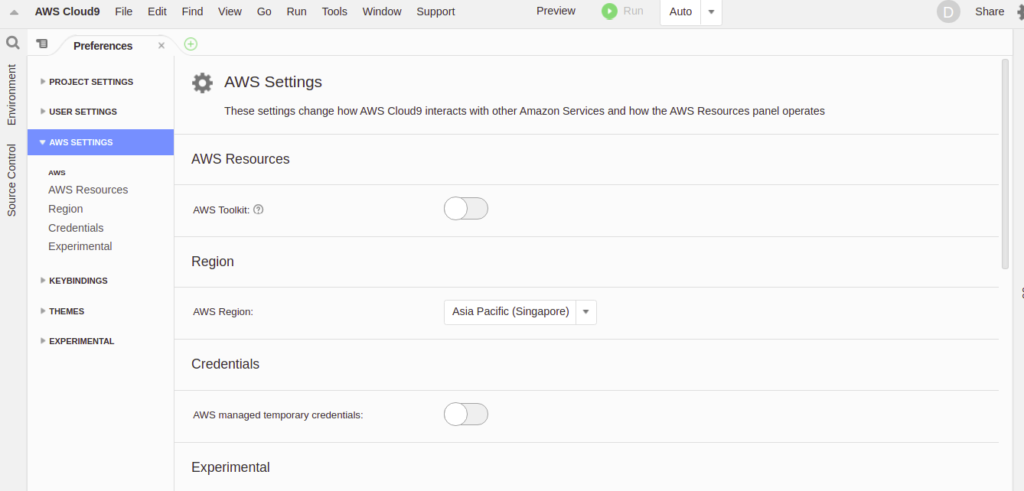
AWS Cloud9 IDE ဒါမှမဟုတ် အခြားကိုယ်ကြိုက်ရာ IDE ကိုသုံးလို့ရပါတယ်. VIM ကိုသုံးလဲရပါတယ်.
ကျွန်တော်က AWS Cloud9 IDE ကိုသုံးထားပါတယ်.
AWS Cloud9 IDE ကိုသုံးမယ်ဆိုရင် Cloud9 ရဲ့ settings မှာ AWS Credentials ကိုပြင်ပေးဖို့လိုပါတယ်.
AWS Cloud9 က default အနေနဲ့ AWS က managed လုပ်တဲ့ temporary credentials ကိုသုံးပါတယ်.
AWS EC2 Instance Profile ကိုသုံးလဲရပါတယ်.
ကျွန်တော်တို့ aws programmatic access အတွက်ထုတ်ထားတဲ့ key တွေကို သတ်မှတ်ပေးဖို့လိုပါတယ်.
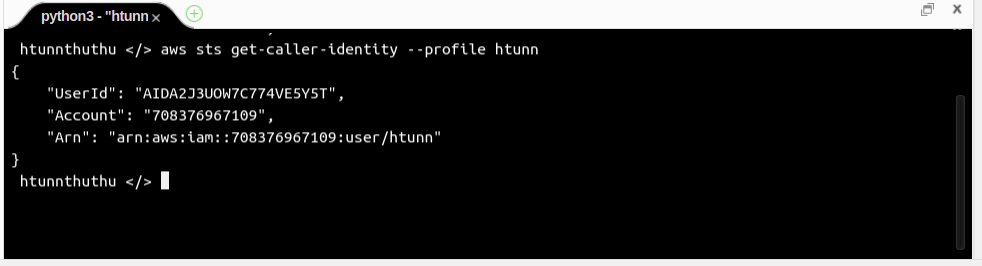
aws configureကျွန်တော်တို့ aws access key and secret access key ကိုသတ်မှတ်ပြီးရင် စမ်းကြည့်လို့ရပါတယ်.
aws sts get-caller-identity --profile htunnကျွန်တော်က aws-cli အတွက် key တွေကို profile အလိုက်ခွဲထားလို့ ” –profile ” ကိုသုံးထားတာပါ.
တကယ်လို့ “–profile “ ကို မထည့်ဘဲ run ရင် aws-cli က default profile ကိုသုံးမှာပါ.
ကျွန်တော်တို့ aws နဲ့ပါက်သတ်တဲ့ အပိုင်းတွေပြီးရင်တော့ ansible dynamic inventory plugins အပိုင်းကိုကြည့်ရအောင်.
ansible inventory ကို file or directory နှစ်မျိုးလုံမှာ သက်မှတ်လို့ရပါတယ်.
ကျွန်တော်တို့ manage လုပ်ချင်တဲ့ resources တွေကသိပ်မများရင် inventory file ကိုသုံးရတာအဆင်ပြေပါတယ်, တစ်ကယ်လို့ resources တွေကများနေရင် inventory directory ကို create လုပ်ပြီး inventory directory ထဲမှာ သက်ဆိုင်ရာ resources အလိုက် ခွဲပြီးသက်မှတ်တာပိုကောင်းပါတယ်.
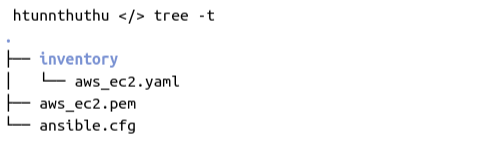
ကျွန်တော်တို့ ansible ကို run မဲ့ hosts မှာ directory တစ်ခုအရင် create လုပ်ပါမယ်.
mkdir testtest direcory ထဲမှာ ansible.cfg and inventory directory ကို create လုပ်ပါမယ်.
mkdir inventory
vim ansible.cfg
[defaults]
inventory=./inventory
deprecation_warnings=False
private_key_file=aws_ec2.pem
remote_user=ubuntu
[inventory]
enable_plugins = aws_ec2
[privilege_escalation]
become=True
become_method=sudo
become_user=rootကျွန်တော်တို့ ansible.cfg မှာသက်မှတ်ချင်တာတွေကို /etc/ansible/ansible.cfg ကနေနမူနာယူလို့ရပါတယ်.
ansible ကို pip နဲ့ install လုပ်ထားရင်တော့ /etc/ansible/ansible.cfg file ကပါမလာပါဘူး. apt or yum နဲ့ install လုပ်ထားရင်တော့ပါ ပါတယ်.
inventory directory ထဲမှာ aws_ec2.yaml ကို create လုပ်ပါမယ်.
cd inventory
vim aws_ec2.yaml
---
plugin: aws_ec2
aws_profile: htunn
region: ap-southeast-1
strict: False
keyed_groups:
- key: tags
prefix: tag
- key: placement
prefix: aws_region
hostnames:
- ip-address
- dns-name
ကျွန်တော်တို့ test project ရဲ့ directory ကိုနမူနာကြည့်ပါ.
ansible မှာ aws_ec2 plugins ကိုမသုံးခင်မှာ amazon.aws collection ကို install လုပ်ထားလာအရင် check လုပ်ပါ.
aws_ec2 plugins က amazon.aws collection ထဲမှာပါတာပါ.
ansible-galaxy collection list | grep 'aws'
ကျွန်တော် ansible ကိုသုံးပြီး AWS EC2 instances တွေရဲ့ inventory ကိုစမ်းခေါ်ကြည့်ရအောင်.
ansible-inventory --graph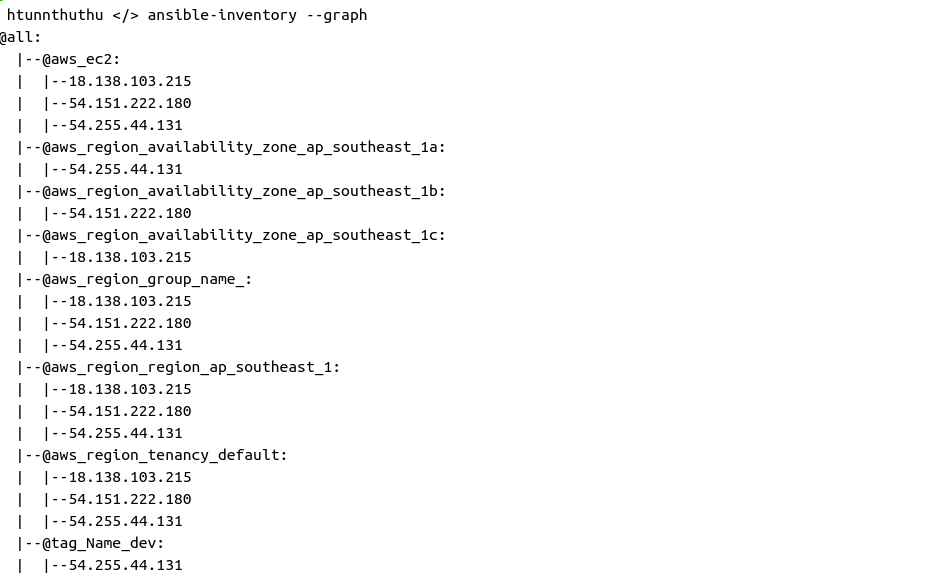
ကျွန်တော်တို့ aws_ec2.yaml ထဲမှာသက်မှတ်ထားတဲ့ aws profile ထဲမှာရှိတဲ့ EC2 instances တွေရဲ့ inventory ကိုပြတာပါ.
တစ်ကယ်လို့ ကျွန်တော်တို့ AWS Account တွေကတစ်ခုထက်ပိုနေရင် inventory directory မှာ AWS Account or Environment ပေါ်မူတည်ပြီး aws_ec2.yaml ကိုခွဲပြီးသက်မှတ်ထားလို့ရပါတယ်.
aws_ec2.yaml မှာသက်မှတ်လို့ရတာတွေကို အောက်ပါ link မှာ နမူနာကြည့်ပြီး သတ်မှတ်လို့ရပါတယ်.
aws_ec2.yaml မှာ list အနေနဲ့ ec2 instance တွေရဲ့ specification တွေကိုထည့်သုံးလို့ရပါတယ်.
ec2 instance တွေရဲ့ specification တွေကိုအောက်ပါ link မှာနမူနာကြည့်ပါ.
ကျွန်တော် ansible ad-hoc command ကိုသုံးပြီး instances တွေကိုစမ်းကြည့်ရအောင်.
ကျွန်တော်က aws_ec2 group ကိုသုံးထားပါတယ်. tag_name, region ပေါ်မူတည်ပြီးလဲ run လို့ရပါတယ်.
ansible aws_ec2 -m ping -b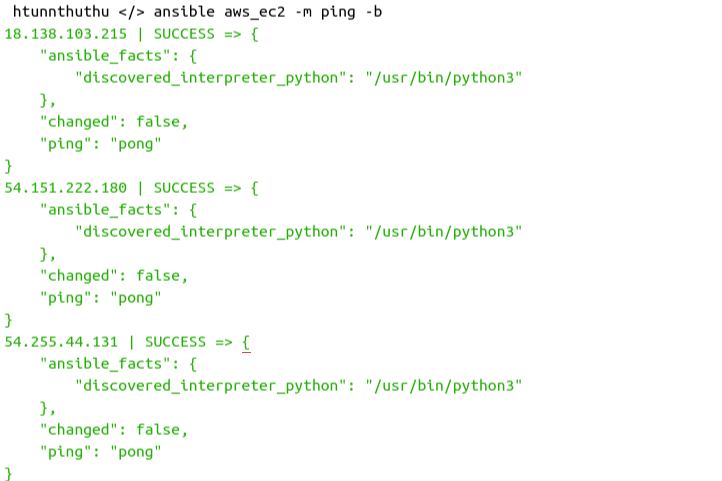
ကျွန်တော်တို့ tag name နဲ့ run ကြည့်ရအောင်.
ansible tag_env_prod -m ping -b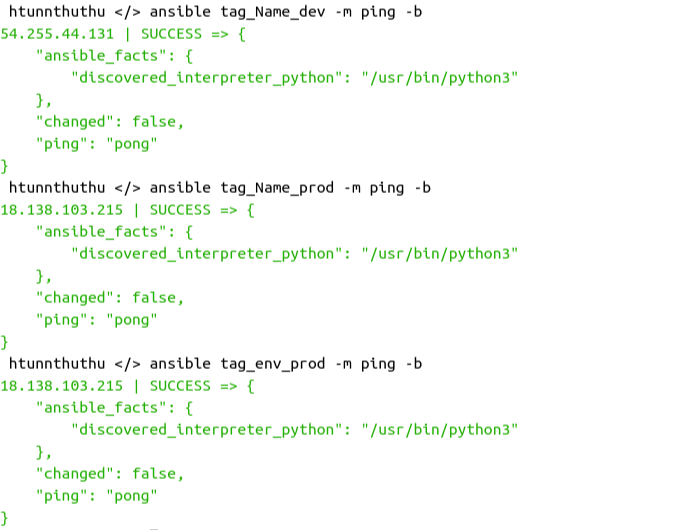
ကျွန်တော်တို့ region နဲ့ run ကြည့်ရအောင်.
ansible aws_region_region_ap_southeast_1 -m ping -b 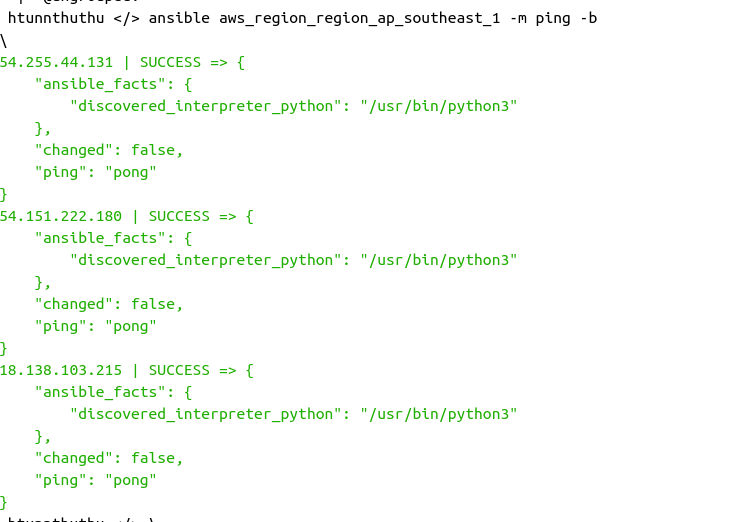
ကျွန်တော်တို့ AWS EC2 Console မှာ instances တွေရဲ့ public ip တွေကိုကြည့်ရအောင်.
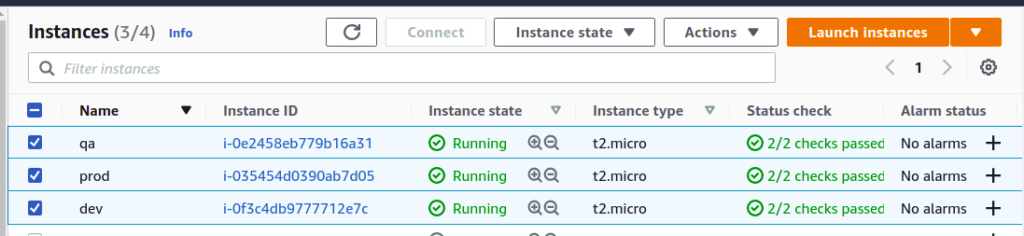
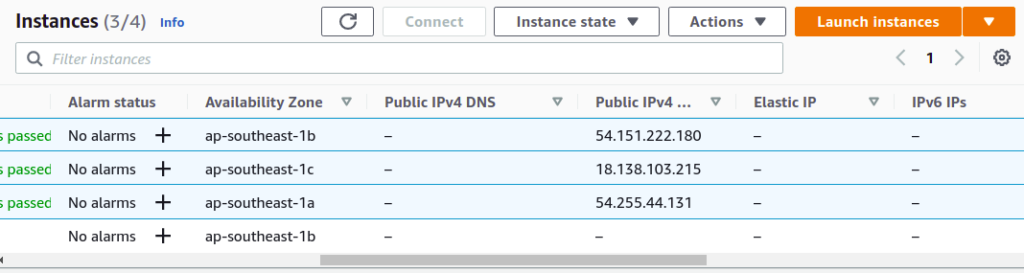
EC2 instances တွေရဲ့ public ip ကို elastic ip နဲ့ မသက်မှတ်ထားပါဘူး. Instances တွေကို stop လုပ်လိုက်ရင် public ip တွေကပြောင်းသွားမှာပါ.
ansible က aws_ec2 dynamic inventory plugins ကိုသုံးထားလို့ EC2 instances တွေရဲ့ public ip ကို AWS EC2 API ကနေနဲ့ API call ခေါ်ပြီးသုံးလို့ရပါတယ်.
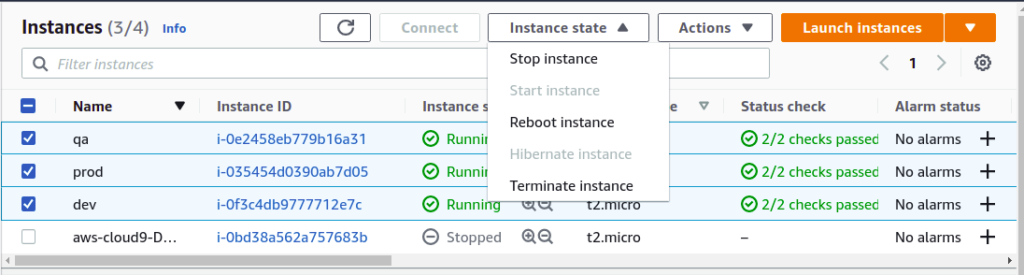
ကျွန်တော်တို့ EC2 instances တွေကို stop လုပ်ကြည့်ရအောင်.
EC2 Instances တွေရဲ့ public ip တွေကို check လုပ်ပါ.
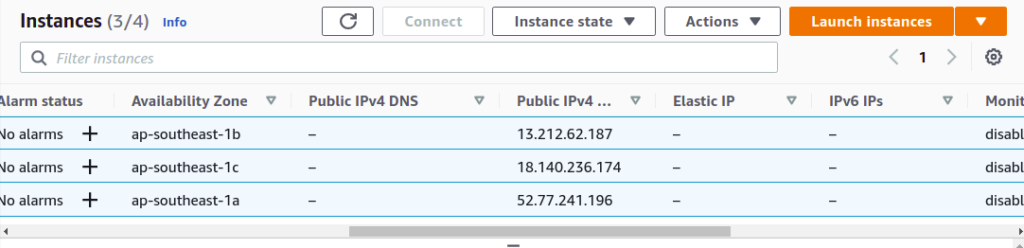
EC2 instances တွေရဲ့ public ip တွေကပြောင်းသွားပါတယ်, ဒါပေမဲ့ ကျွန်တော်တို့က ansible inventory မှာပြန်ပြင်ဖို့မလိုပါဘူး.
Dynamic Inventory ကိုသုံးထားလို့ပါ.
ansible-inventory command နဲ့ပြန်စမ်းကြည့်ရအောင်.
ansible-inventory --graph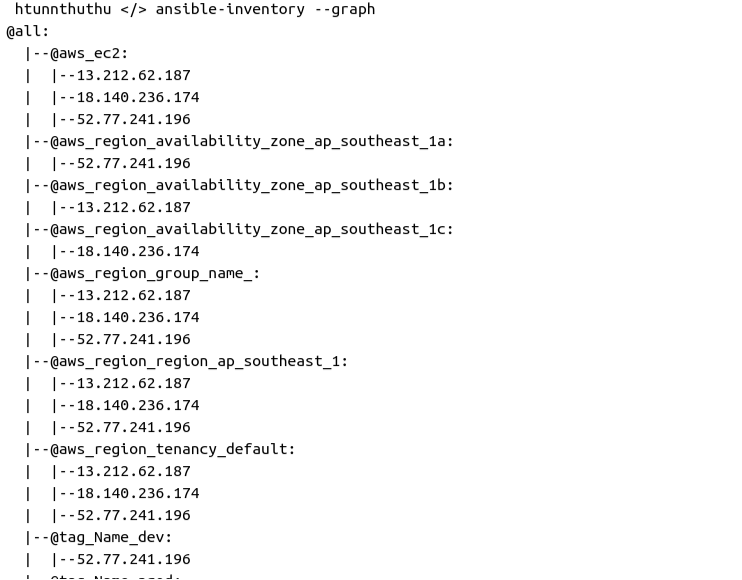
ကျွန်တော်တို့ ansible dynamic inventory ကို ansible playbook မှာသုံးကြည့်ရအောင်.
vim hello.yaml---
- name: Ansible Dynamic Inventory
gather_facts: false
hosts: aws_region_region_ap_southeast_1
tasks:
- name: Run Shell Command
command: echo "Hello World"
register: hello
- name: use debug module
debug:
var: hello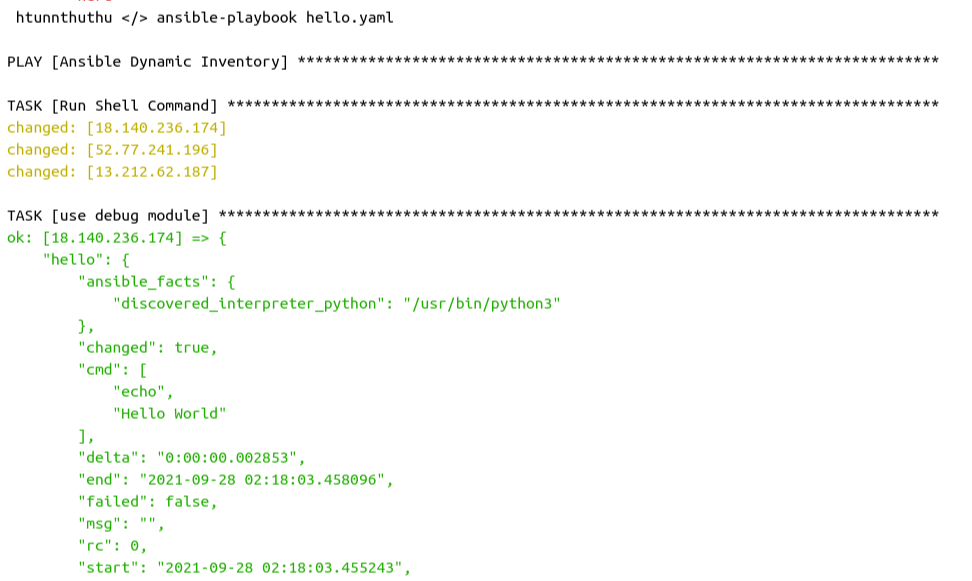

ansible ကိုဆက်လေ့လာလိုလျှင်.
https://www.ansiblefordevops.com/
https://www.jeffgeerling.com/blog/2020/ansible-101-jeff-geerling-youtube-streaming-series