ansible က variables တွေကိုသုံးပြီး resources တွေကို manage လုပ်ပါတယ်. ansible_facts and ansible_local တို့က ansible ကသတ်မှတ်ထားတဲ့ special variables တွေပါ, user ကသတ်မှတ်လို့ မရပါဘူး.
automate လုပ်မဲ့ resources တွေမှာသုံးမဲ့ variables တွေကို playbook, inventory, files, roles, and ansible ad-hoc command-line မှာ သတ်မှတ်လို့ရပါတယ်.
playbook run လို့ရလာတဲ့ return value ကို register keyword ကိုသုံးပြီး variables အနေနဲ့သုံးလို့ရပါတယ်.
variables file ကို yaml format နဲ့ ရေးတာများပါတယ်, JSON ကိုလဲသုံးပါတယ်. INI format ကို inventory မှာဘဲသုံးပါတယ်.
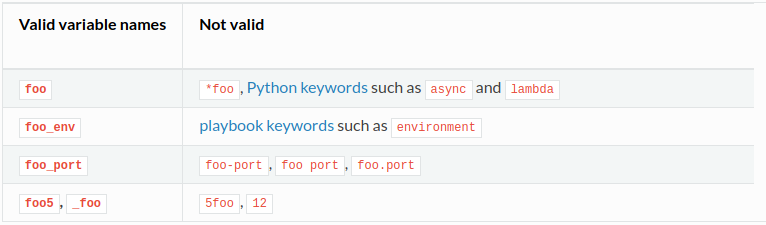
variables မှာ letters, numbers and underscores သုံးလို့ရပါတယ်. variable name ကို number နဲ့ စလို့မရပါဘူး.
variables ကို YAML syntax နဲ့ သတ်မှတ်တာကို ကြည့်ပါ.
YAML List
region:
  - northeast
  - southeast
  - midwest
YAML Dictionary
foo:
  field1: one
  field2: two
variables file ကို vars file or directory မှာ ရေးကြည့်ရအောင်. ” .yaml “ နဲ့ သိမ်းပါ.
vim vars.yaml---
webserver:
name: httpd
document_root: "/var/www/html"
state: started
enabled: true
hosting:
- aws
- azure
- gcpansible မှာ variables ကို ” {{ variables }} ” syntax နဲ့ ခေါ်သုံးလို့ရပါတယ်. Jinja2 syntax ကိုသုံးထားပါတယ်.
variables ကို dot or bracket notation နဲ့ ခေါ်သုံးလို့ရပါတယ်.
"{{ webserver['name'] }}" ( for yaml dictionary )
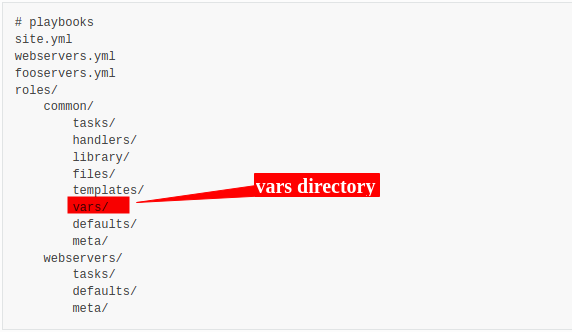
"{{ hosting[0] }}" ( for yaml list )ansible role ထဲမှာလဲ variables ကို vars directory နဲ့သတ်မှတ်လို့ရပါတယ်.
register keyword ကိုသုံးပြီး ansible playbook ရဲ့ return value ကို variables အနေနဲ့ သုံးလို့ရပါတယ်.
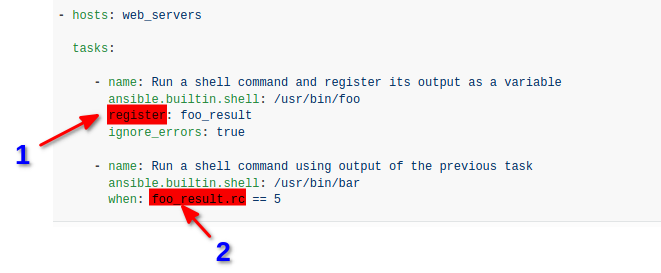
- register keyword ကိုသုံးပြီး shell module ရဲ့ return value ကို foo_result ( variables ) ထဲမှာ မှတ်ထားပါတယ်.
- နောက် tasks တစ်ခုမှာ foo_result ( variables ) ကို when condition မှာပြန်သုံးထားတာပါ.
register variables ကို memory ထဲမှာသိမ်းထားပါတယ်, single playbook မှာဘဲသုံးလို့ရပါတယ်. register keyword သုံးထားတဲ့ playbook မှာဘဲသုံးလို့ရတာကို ပြောတာပါ.
register variables ကို loop နဲ့ တွဲသုံးရင်, variables ကိုပြန်ခေါ်တဲ့ အခါမှာ ” results ” attraibute ကိုထည့်ပေးရပါတယ်.
- name: Register loop output as a variable
  shell: "echo {{ item }}"
  loop:
    - "one"
    - "two"
  register: echo
register လုပ်ထားတဲ့ variables ကို playbook မှာ ပြန်သုံးချင်ရင် ” results ” attribute ကိုထည့်ပေးရပါတယ်.
- name: Fail if return code is not 0
  ansible.builtin.fail:
    msg: "The command ({{ item.cmd }}) did not have a 0 return code"
  when: item.rc != 0
  loop: "{{ echo.results }}"
တစ်ကယ်လို့ ကျွန်တော်တို့ register keyword သုံးထားတဲ့ tasks က fail or skipped ဖြစ်ရင် fail or skipped ဖြစ်တဲ့ result ကိုဘဲ မှတ်ထားမှာပါ.
variables တွေကို ansible playbook မှာ “vars” keyword ကိုသုံးပြီးသတ်မှတ်လို့ရပါတယ်.
- hosts: webservers
  vars:
    http_port: 80
variables ကို ansible playbook မှာသတ်မှတ်ရင်, သတ်မှတ်ထားတဲ့ playbook မှာဘဲသုံးလို့ ရပါတယ်.
တစ်ကယ်လို့ variables ကို မတူညီတဲ့ playbook မှာသုံးမယ်ဆိုရင် vars file or directory, roles တွေမှာသတ်မှတ်တာပိုကောင်းပါတယ်.
sensitive ဖြစ်တဲ့ data တွေကို source control ( git ) မှာ သိမ်းတဲ့အခါမှာ variables ကို file or folder ခွဲထားတဲ့အတွက် gitignore မှာ သတ်မှတ်ရတာ အဆင်ပြေပါတယ်.
vim .gitignorevars.yaml
vars/vars file and directory ကို gitignore file မှာ သတ်မှတ်ထားတာပါ.
vars file and directory ကိုကြိုက်ရာ နံမည် ပေးလို့ရပါတယ်.
vars file or directory မှာ သတ်မှတ်ထားတဲ့ variables ကို playbook မှာ include file and roles ကို သုံးပြီးခေါ်သုံးလို့ရပါတယ်.
external vars file မှာ သတ်မှတ်ထားတဲ့ variables ကို playbook မှာ ” vars_files ” keyword ကိုသုံးပြီး ခေါ်သုံးလို့ရပါတယ်.
---

- hosts: all
  remote_user: ansible
  vars:
    server: httpd
  vars_files:
    - vars.yaml

  tasks:

  - name: This is just a placeholder
    command: /bin/echo foo
variables ကို command line မှာ ” –extra-vars “ keyword နဲ့သတ်မှတ်လို့ရပါတယ်. single quote ( ‘ ‘ ) ကိုသုံးပါ.
ansible-playbook release.yml --extra-vars "version=1.23.45 other_variable=foo"adding variables to inventory
ကျွန်တော်တို့ variables တွေကို inventory file မှာ host or groups လိုက်သတ်မှတ်လို့ရပါတယ်. INI or YAML format ကိုသုံးလို့ရပါတယ်.
host အလိုက် variables သတ်မှတ်တာကိုကြည့်ပါ.
[webserver]
host1 http_port=80 maxRequestsPerChild=808
host2 http_port=303 maxRequestsPerChild=909
webserver group ထဲက host အလိုက် variables သတ်မှတ်လို့ရပါတယ်.
groups အလိုက် variables သတ်မှတ်တာကိုကြည့်ပါ.
[webserver]
host1
host2
[webserver:vars]
ntp_server=ntp.atlanta.example.com
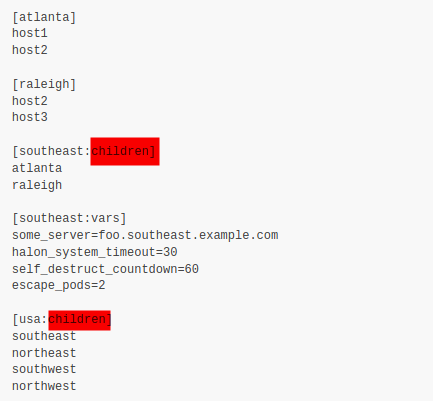
proxy=proxy.atlanta.example.comwebserver group အတွက် variables ကို ” vars “ keyword ကိုသုံးပြီး group လိုက်သတ်မှတ်လို့ရပါတယ်.
group variables တွေကို ” :children “ suffix ကို သုံးပြီး inherit လုပ်လို့ရပါတယ်.
host_vars and group_vars
ကျွန်တော်တို့ host and groups ပေါ်မူတည်ပြီး variables ကို သတ်မှတ်လို့ရပါတယ်.
host and groups variables အတွက် file ခွဲပြီးသတ်မှတ်တာကိုပြောတာပါ. YAML or JSON format နဲ့ရေးလို့ရပါတယ်.
ကျွန်တော်တို့ host and groups ကို inventory မှာသတ်မှတ်ထားတာကိုကြည့်ပြီး နမူနာ ကြည့်ပါ.

ကျွန်တော်တို့ host and group variables သတ်မှတ်ဖို့ ( host_vars and group_vars ) directory ကို create လုပ်ဖို့လိုပါတယ်.
host variables အတွက် host_vars directory ကို create လုပ်ဖို့လိုပါတယ်.
group variables အတွက် group_vars directory ကို create လုပ်ဖို့လိုပါတယ်.
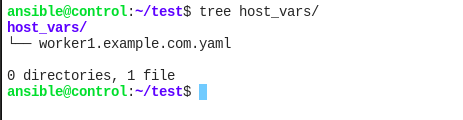
host variables ကို သတ်မှတ်ကြည့်ပါ.
 mkdir host_vars
 vim worker1.example.com
---
webserver: apache2
state: presentကျွန်တော်တို့ host_vars, group_vars မှာသတ်မှတ်ထားတဲ့ variables တွေကို ansible playbook မှာ define လုပ်ဖို့မလိုပါဘူး.
ansible playbook နဲ့ directory တစ်ခုထဲမှာ ရှိရင် ရပါပြီး.
host_vars directory ထဲမှာ ကိုယ် variables သတ်မှတ်ချင်တဲ့ host ရဲ့ name ဖြစ်ဖို့လိုပါတယ်.
host_vars ကို ansible playbook မှာသုံးကြည့်ပါ. variables ကို “{{ variables }}” jinja2 syntax နဲ့ခေါ်သုံးဖို့လိုပါတယ်.
vim test_var.yaml---
- name: test host_vars
hosts: worker1.example.com
tasks:
- name: create server
apt:
name: "{{ webserver }}"
state: "{{ state }}"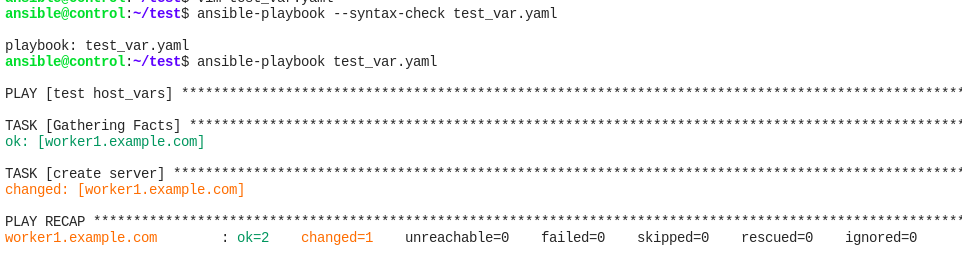
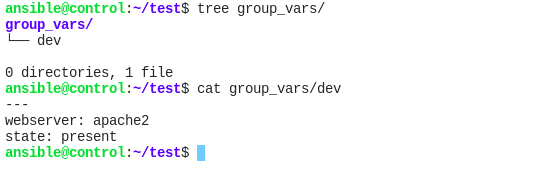
group variables ကို သတ်မှတ်ကြည့်ပါ.
 mkdir group_vars
 vim dev
---
webserver: apache2
state: presentgroup_vars directory ထဲမှာ ကိုယ် variables သတ်မှတ်ချင်တဲ့ group ရဲ့ name ဖြစ်ဖို့လိုပါတယ်.
group_vars ကို ansible playbook မှာသုံးကြည့်ပါ.
vim test_var_group.yaml---
- name: test host_vars
hosts: dev
tasks:
- name: create server
apt:
name: "{{ webserver }}"
state: "{{ state }}"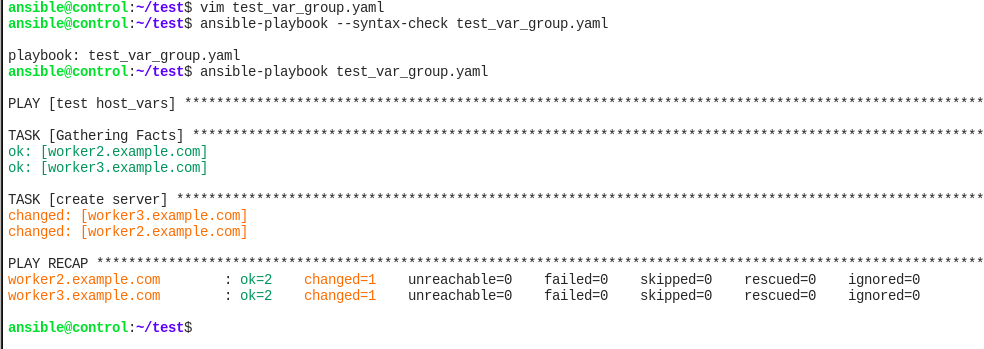
host_vars and group_vars ကို ” /etc/ansible “ directory မှာ လဲသတ်မှတ်လို့ရပါတယ်.
Source Code Management ( git ) အတွက် project မှာ သတ်မှတ်တာပိုကောင်းပါတယ်.
special variables
ansible_facts, ansible_local တို့က ansible က သတ်မှတ်ထားတဲ့ special variables တွေပါ, user ကသတ်မှတ်လို့မရပါဘူး.
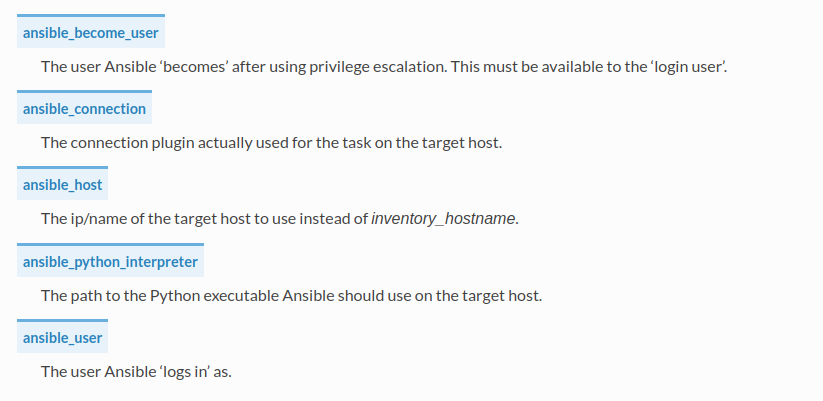
special variables တွေကို အောက်ပါ link မှာကြည့်ပါ.
https://docs.ansible.com/ansible/latest/reference_appendices/special_variables.html
variables precedence
ansible variables မှာ priority ရှိပါတယ်. variables priority ကို ကြည့်ပါ.
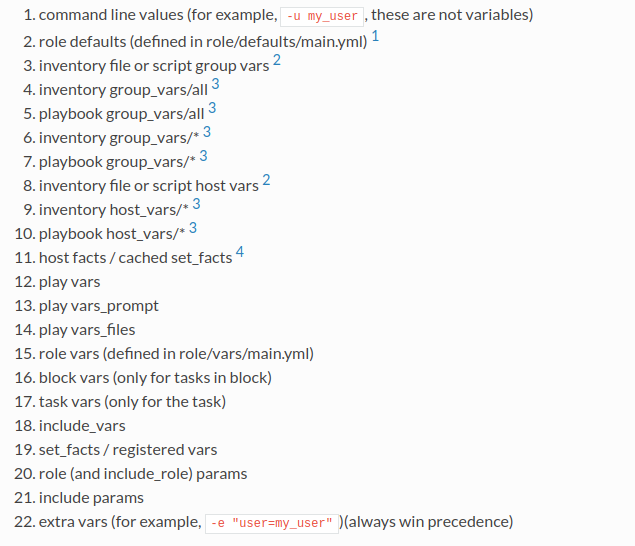
command line မှာသုံးတဲ့ extra vars က priority အမြင့်ဆုံးပါ.
ansible variables အတွက် details ကို အောက်ပါ link မှာကြည့်ပါ.
https://docs.ansible.com/ansible/latest/user_guide/playbooks_variables.html
ansible ကို ဆက်လေ့လာလိုလျှင်.
https://www.ansiblefordevops.com/
https://www.jeffgeerling.com/blog/2020/ansible-101-jeff-geerling-youtube-streaming-series